
This option allows you to define which fields you want to use in your subscription records, which fields are mandatory and which fields are copied over to a new subscription when you choose the copy command. This option is defined once for the entire system.
After choosing this option you will be presented with an overview screen:
: After selecting this option, the following form will be presented:

Note:
The In use/active check box is only available if none of the fields for this group are selected in the Data to be entered and Data to be corrected parameters (see below).
: Select a group and click this button to modify the elements of that group. You are presented with the overview screen listing the elements of the selected group:

Double-click the field you want to modify:

·
Enter the Wording you want for the field
·
Check the In use/active check box
·
Check the Mandatory check box if you want this field to be filled in for every subscription
·
Check whether this field is copied when you use the function
·
Select a Data type from the drop-down box. The default is Text. Caution: if you want to use the Combo option contact Infor for advice.
·
You can enter a Default that will be entered for each new item
·
Cache Format Pattern is any valid Cache Object Script pattern
·
Select an option from Automatic format conversion (not mandatory)
·
Select a Standard Validation Test if applicable (You can ignore this option)
· In some cases there will be an Authority List linked to the authority list behind the field. You cannot modify this field.
The next three menu options, Data to be entered – subscriptions, Data to be corrected – subscriptions and Data to be displayed – subscriptions are used to define which fields you wish to appear when adding, updating and displaying subscriptions respectively. These options are defined for each institution that uses serials.
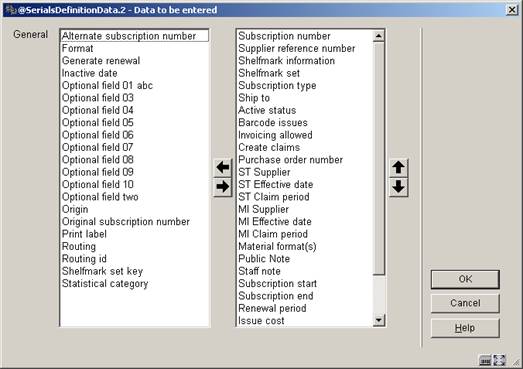
The fields selected on the Data to be entered form are shown when a new subscription is added. The group names and the field names displayed here are those previously defined In use in the Subscription Definition Settings.
When you choose this option the following form is presented:
·
Select the fields on the left hand side
·
Click the Right arrow to enter them for display.
· Use the Up and Down arrows to determine the order for display.
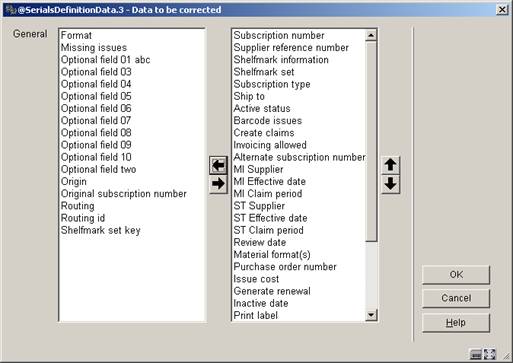
The groups and fields selected on the Data to be corrected form are shown when updating a subscription record. The group names and the field names displayed here are those previously defined In use in the Subscription Definition Settings.
When you choose this option the following form is presented:
·
Select the fields on the left hand side
·
Click the Right arrow to enter them for display.
· Use the Up and Down arrows to determine the order for display.
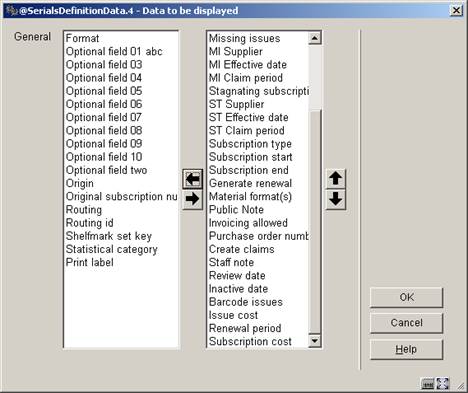
The groups and fields selected on the Data to be displayed form are shown when looking at a subscription record in various places in the system. The group names and the field names displayed here are those previously defined In use in the Subscription Definition Settings.
When you choose this option the following form is presented:
·
Select the fields on the left hand side
·
Click the Right arrow to enter them for display.
· Use the Up and Down arrows to determine the order for display.
There are a number of authority lists defined for use in the serials system. The Serials authority lists are listed below:
·
Authority list 4200 – MARC21 frequency codes
·
Authority list 4201 – UNIMARC frequency codes
·
Authority list 4202 – chronology code types
·
Authority list 4203 – chronology code date format
·
Authority list 4204 – combined year formats
·
Authority list 4207 - publication regularity codes
·
Authority list 4208 – subscription type
·
Authority list 4209 – material formats
·
Authority list 4210 – format
·
Authority list 4211 – 4220 subscription optional fields
·
Authority list 4221 – subscription statistical category
·
Authority list 4222 – origin
·
Authority list 4223 - Type of holding description
·
Authority list 4224 - Type of holding OPAC label
There are two types of authority list. One type has all of its entries defined by the library and is used for information purposes only (i.e. material formats – the library adds an entry for each material format it wants to track within the serials system). The other type is used to control processing within the serials system. You will notice that some lists do not allow you to add or delete entries. For these lists, you should only update the wording of the entry. A brief description of some of these lists follows.
Frequency codes are used to determine the frequency of publication. Sample frequency codes include annual, bimonthly, semi-weekly, daily, biweekly, semi-annual, biennial, triennial, three times a week, three times a month, monthly, quarterly, semi-monthly, three times a year, quadrennial, weekly, completely irregular, quinquennial and decennial. These codes are supplied with the system and cannot be added or deleted by the library. You should only change the contents of tag 100 (wording) for these entries. Tag 601 contains the one-character alphabetic code assigned by either MARC21 or UNIMARC for the associated frequency code. Do not change the contents of tag 601.
MARC21 codes are below:
·
0 - a - Annual
·
1 - b - Bimonthly
·
2 - c – Semi-weekly
·
3 - d - Daily
·
4 - e - Biweekly (every 2 weeks)
·
5 - f – Semi-annual
·
6 - g - Biennial (every 2 years)
·
7 - h - Triennial (every 3 years)
·
8 - i - Three times a week
·
9 - j - Three times a month
·
10 - m – Monthly
·
11 - q – Quarterly
·
12 - s – Semi-monthly
·
13 - t - Three times a year
·
14 - w – Weekly
·
15 - x - Completely irregular
·
16 - v - Quadrennial (every 4 years)
·
17 - y - Quinquennial (every 5 years)
·
18 – z – Decennial (every 10 years)
UNIMARC codes are below:
·
0 - k = annual
·
1 - g = bimonthly (every two months)
·
2 - b = semi-weekly (twice a week)
·
3 - a = daily
·
4 - d = biweekly (every two weeks)
·
5 - j = semi-annual (twice a year)
·
6 - 1 = biennial (every two years)
·
7 - m = triennial (every three years)
·
8 - n = three times a week
·
9 - o = three times a month
·
10 - f = monthly
·
11 - h = quarterly
·
12 - e = semi-monthly (twice a month)
·
13 - i = three times a year
·
14 - c = weekly
·
15 - y = no frequency (i.e. irregular).
·
19 - u = unknown
· 20 - z = other
Chronology code types allow you to define the format of a predicted chronology field. For example, a date – 2005-09-03, a month – September, a day of the week – Saturday, etc. The following codes are supplied:
·
0 - Date
·
1 - Months
·
2 - Seasons
·
3 - Year (YYYY)
·
4 - Day of month
·
5 - Day of week
·
6 - No predictions
·
7 - Combined year (previous/current)
·
8 - Combined year (current/next)
·
9 - Combined month and day (MMM dd)
These codes are supplied with the system and cannot be added or deleted by the library. You should only change the contents of tag 100 for these entries.
Chronology code date formats allow you to define which date format to use when predicting chronology. The following codes are supplied:
·
0 - DD Mmm [YY]YY (01 Jul 97 or 27 Mar 2002)
·
1 - MM/DD/[YY]YY (07/01/97 or 03/27/2002)
·
2 - DD Mmm [ YY ]YY (01 Jul 97 or 27 Mar 2002)
·
3 - YYYY-MM-DD (1997-07-01 or 2002-03-27) - ODBC format
·
4 - DD/MM/[YY]YY (01/07/97 or 27/03/2002) - European format
·
5 - Mmm D, YYYY (Jul 1, 1997 or Mar 27, 2002)
·
6 - Mmm D YYYY (Jul 1 1997 or Mar 27 2002)
·
7 - Mmm DD [YY]YY (Jul 01 97 or Mar 27 2002)
·
8 - YYYYMMDD (19970701 or 20020327) - Numeric format
·
9 - Mmmmm D, YYYY (July 1, 1997 or March 27, 2002)
These codes are supplied with the system and cannot be added or deleted by the library. You should only change the contents of tag 100 for these entries.
Combined year format allows you to specify the format of the predicted chronology when the chronology portion of the issue numbering contains combined years. The following codes are supplied:
·
0 - YYYY/YYYY
·
1 - YYYY/YY
·
2 - YY/YY
These codes are supplied with the system and cannot be added or deleted by the library. You should only change the contents of tag 100 for these entries.
Publication regularity codes are used to enable the system to predict a serial item’s publication dates. There are five different types of publication consisting of days-based, seasons-based, months-based, erratic and user defined. When one of these types is assigned to a publication pattern, it controls which fields the user enters to define the publication regularity. For a days-based code, the system prompts for the days of the week that the publication arrives as well as the number of weeks between receipts. For a months-based code, the system prompts for the months in which the title is published. The following codes are supplied:
·
0 – Days-based
·
1 – Seasons-based
·
2 – Months-based
·
3 - Erratic
·
4 - Defined by user
These codes are supplied with the system and cannot be added or deleted by the library. You should only change the contents of tag 100 for these entries.
Subscription type is used to describe how the subscription is obtained. The system supports the following three types:
·
1- Paid
·
2 - Free
·
3 – Membership
These codes are supplied with the system and cannot be added or deleted by the library. You should only change the contents of tag 100 for these entries.
Can be used to record the material format(s) of material arriving on a subscription (i.e. BNB on CD-ROM, loose-leaf legal updating services). This authority list is maintained solely by the library.
The Format authority list is used to determine whether a subscription entitles you to electronic issues, print issues or both. The system supports the following three codes:
·
0 – Print
·
1 – Electronic
·
2 - Both
These codes are supplied with the system and cannot be added or deleted by the library. You should only change the contents of tag 100 for these entries.
The library has the ability to define 10 optional fields in the subscription record. In the case that you wish to authority control an optional field, use authority lists 4211 through 4220 to correspond to Optional fields 1 through 10 in the subscription. These authority lists are maintained solely by the library.
Can be used to record the statistical category for a subscription. This authority list is maintained solely by the library.
Can be used to record the origin of the subscription. For example: French, not French, local, etc.). This authority list is maintained solely by the library.
The standard system is installed with three default entries – one for issues, indexes and supplements. These are used when adding a new Type of holdings record (in AFO 321). These defaults can be changed or deleted. After installation of the system, these authority lists are maintained solely by the library.
The standard system is installed with three default entries – one for issues, indexes and supplements. These are used when adding a new Type of holdings record (in AFO 321). These defaults can be changed or deleted. After installation of the system, these authority lists are maintained solely by the library.
Shipto codes are defined within the Serials systems and are stored at the MetaInstitution for Serials level. The Ship to code is mandatory in a subscription and defines the location where the items for a subscription will be received. If you have five receiving locations for your serials, you set up five Ship to codes. If all of your serials are received centrally, only one Ship to code needs to be set up on your system. The Ship to code is instrumental in allowing receiving of multiple subscriptions (with differing shelfmarks) at the same time. You are allowed to add, update and delete ship to codes. It is not advisable to delete codes that are already in use by the system. After choosing this option an overview screen is displayed:

Each line in the grid represents a different SHIPTO code.
[I] – To add a new code. Please refer to section 367.5.1.
[*] – Select a code and then this option to modify code. Please refer to section 367.5.1.
[S*] – Select a code and then this option to delete an existing code. Do not delete codes that are already in use by the system.
After choosing the option

Code – Unique identifier assigned to this code. Cannot be changed once the code has been added to the system.
ShipTo Address – free text field. Can be left blank.
Chronology codes are used to determine how the publication date is displayed. For example, day, day of week, three character months, seasons, year, split year combination, quarters, etc.
After choosing this option an overview screen is displayed:
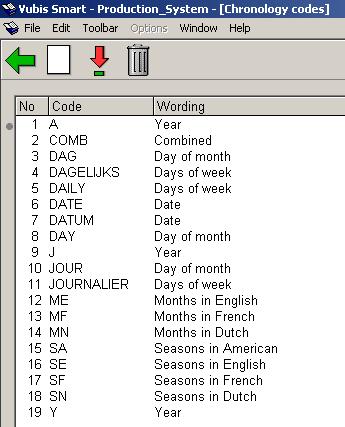
Each line in the grid represents a different Chronology code and consists of the Code and Wording assigned to the code.
[I] – To add a new code. Please refer to section 367.6.1.
[*] – Select a code and then this option to change an existing code. Please refer to section 367.6.1.
[S*] – Select a code and then this option to delete an existing code. Do not delete codes that are already in use by the system.
After choosing the option

Code – Unique identifier assigned to this code. Cannot be changed once the code has been added to the system.
Wording - Brief description in each language of the chronology code.
Type - this field is a dropdown list containing the entries from Authority list 4202
Date format - is a dropdown list of entries from Authority list 4203. This field is only used if you choose 0 – Date from the Type field. This field defines how you want the date to display in your chronology field.
Valid predictions - is used for Types 1- Months, 2 – Seasons and 5 – Day of week. For types 1 and 2, enter twelve predictions (separated by comma) corresponding to the twelve months of the year starting in January. For example, a valid Seasons entry for North America might include: Winter,Winter,Spring,Spring,Spring,Summer,Summer,Summer,Fall,Fall,Fall,Winter. When the system detects that an issue is expected in May, it will consult this list of valid predictions to determine that the correct chronology to display is Spring.
For type 5 – Day of week, enter seven predictions (separated by comma) corresponding to the seven days of the week beginning with Sunday.
Combined year format - is a dropdown list of entries from Authority list 4204 and is only valid if you chose Types 7 – combined year(previous/current) or 8 – combined year (current/next).Entries include: 0 - YYYY/YYYY, 1 - YYYY/YY and 2 - YY/YY.
Combined year separator - is used in conjunction with the previous field and defines the character that is used to separate the combined years. For example, if the Type was set to 7, Combined year format set to 0 - YYYY/YYYY and the Combined year separator set to “/”, a prediction for January 1, 2005 would result in a predicted chronology of 2004/2005.
Issue status codes are used to track the status of each issue and can be assigned to a serial item when it is checked in. For example, if a serials item has not been delivered in the expected time, your library can make a manual claim to the supplier by assigning the Claimed issue status code. Other examples of these codes are received, returned, in bindery, bound, missing, expected, not yet published, etc. These codes are also used to build summary holdings statements and to define what should be displayed to WebOpac users.
There are twenty-one Issue status codes; six are definable by the library. The user definable codes are numbered 15 through 20 and referred to as Optional 1 through Optional 6. Use these codes to define statuses such as Not published, In process, and so forth.
Codes may not be added or deleted from the list. You may only change the details of the code.
After choosing this option an overview screen is displayed:
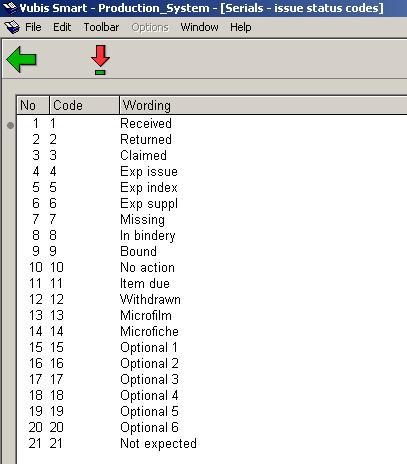
Each line in the grid represents a different Issue status code and consists of the Code and Wording assigned to the code.
- Select a status code and click on this option to display the code’s details. The following input form is displayed:
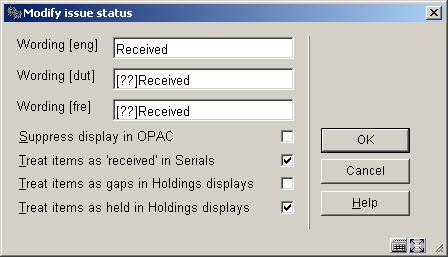
Wording– the wording for this status code in each language.
Suppress display in OPAC – if set, do not show issues with this status to users in the WebOpac. For example, you may not want to show the public claimed issues. This field does not affect the display of the summary holdings statement to the WebOpac user, nor the display of parts information in other modules of the system.
Treat items as ‘received’ in Serials – determines whether items with this status code will be regarded as Received when the serials Receiving screen is displayed. Allows you to specify that items with status of Received, In bindery, Bound, and so forth, have really been received by the library. The message Received xx/yy on the serials Receiving screen will reflect this.
If not set, item has not been received. Displays as not received on the serials Receiving screen. The actual status may be Item due, Claimed, Returned, or Missing.
If set, consider this item as received by library and display as received on the serials Receiving screen. Allows you to assign an implied status of received though the actual status is Bound.
Treat items as gaps in Holdings displays – Determines whether or not items with this status code will be treated as non-gap or gap breaks in holdings statements. Corresponds to the USMARC Holdings fields 863/4/5 $w. This parameter has an effect only if Treat items as Held in Holdings display? is not set.
If not set and the item is not treated as held by the library, the exported MARC record containing the location’s holdings will be built showing a non-gap break (tag 863/4 subfield w is assigned a value n for a non-gap indicator). For example, a status code representing unpublished parts. Holdings statements will be built with a ; (semicolon – a non-gap break) to indicate that this item is not held by the library. If set and the item is not treated as held by the library, the exported MARC record containing the location’s holdings will be built showing a gap break (tag 863/864 subfield w is assigned a value g for a gap indicator). For example, a status code representing withdrawn parts. Holdings statements will be built with a , (comma – a gap break) to indicate that this item is not held by the library.
Treat items as held in Holdings displays - If not set, the exported MARC record containing the location’s holdings will be built showing either a non-gap or gap break (tag 863/4 subfield w is assigned a value of n or g respectively). As well, summary holdings statements (built according to the MARC21 standard) will display a non-gap break using a “;” (semicolon) and a gap break using a “,” (comma). For example: v.1:no1(1976:Jan.)-v.1:no.4(1976:Apr.),v.1:no.6(1976:June),v.1:no.8(1976:Aug.)-v.1:no.10(1976:Oct.)
The library holds neither v.1:no.5(1976:May) nor v.1:no.7(1976:July).
Numbering codes are used to define whether an enumeration level has continuous numbering or should be reset when the level numbering changes.
After choosing this option an overview screen is displayed:

Each line in the grid represents a different Numbering code and consists of the Code and Wording assigned to the code.
[I] – To add a new code. Please refer to section 367.8.1.
[*] – Select a code and then this option to change an existing code. Please refer to section 367.8.1.
[S*] – Select a code and then this option to delete an existing code. Do not delete codes that are already in use by the system.
After choosing the option
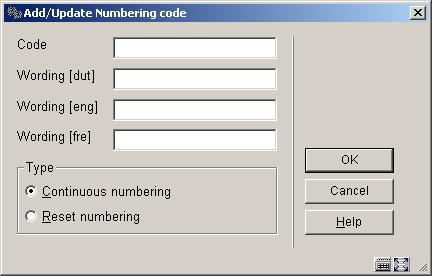
Code – Unique identifier assigned to this code. Cannot be changed once the code has been added to the system.
Wording - Brief description in each language of the numbering code.
Type – choose from:
·
Continuous numbering – choose this entry if numbering is continuous. A publication with 12 issues in a volume and continuous numbering will increment the volume numbering after 12 issues and keep increasing the issue numbering. For example, v.25:no.12 is followed by v.26:no.13 and then v.26:no:14.
· Reset numbering – choose this entry if numbering should reset/restart at 1 when the higher level of enumeration increases. For example, v.25:no.12 is followed by v.26:iss.1 and then v.26:no.2.
Note
Changing the Type once a code is in use by the system will affect the numbering of predicted issues.
Enumeration codes are used to define the format of the numbering found in an enumeration level. Examples of different formats are numeric, alphabetic, roman numerals and free text..
After choosing this option an overview screen is displayed:
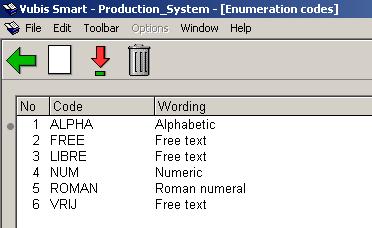
Each line in the grid represents a different Enumeration code and consists of the Code and Wording assigned to the code.
[I] – To add a new code. Please refer to section 367.9.1.
[*] – Select a code and then this option to change an existing code. Please refer to section 367.9.1.
[S*] – Select a code and then this option to delete an existing code. Do not delete codes that are already in use by the system.
After choosing the option

Code – Unique identifier assigned to this code. Cannot be changed once the code has been added to the system.
Wording - Brief description in each language of the enumeration code.
Type - choose from:
·
Numeric – choose this entry if the numbering of the publication is numeric (i.e. 5, 25, 35, etc).
·
Alphabetic – choose this entry if the numbering of the publication is alphabetic (i.e. predictions of A through Z).
·
Roman numeral – choose this entry if the numbering of the publication is a roman numeral ( i.e. CIX).
· Free text – choose this entry to place a constant in the numbering of the publication.
Note
Changing the Type once a code is in use by the system will affect the numbering of predicted issues.
After choosing this option the following input form will be displayed:
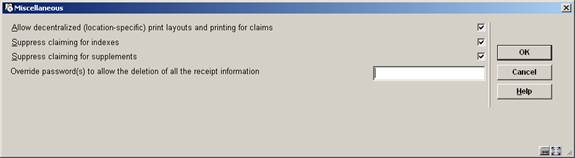
Allow decentralized (location-specific) print layouts and printing for claims: – if checked, you can define different sets of claim print layouts for each location within your serials metainstitution. You would then generate and print claims (AFO 351/2/3) for each location within your serials metainstitution separately.
If not checked, you create one set of claim print layouts and these layouts are used for all claim printing within your serials metainstitution. When you run
AFO 351/2/3, claims for all locations within your serials metainstitution are processed.
The location of a claim is determined by the location in the shelfmark of the subscription.
Suppress claiming for indexes: if checked no claims will be generated for items that have “Index” as their Type of Holding rather than “Issues” or “Supplements”.
Suppress claiming for supplements: if checked no claims will be generated for items that have “Supplement” as their Type of Holding rather than “Issues” or “Index”.
Override password(s) to allow the deletion of all the receipt information: The delete receipt option in AFO 311 is password controlled when deleting multiple receipts to prevent accidental deletion of all receipts. If you select more than one of the received, missing, claimed (all but expected) issues and attempt to delete them a warning message will appear. Next you will be asked for the password to confirm deletion. One issue at a time does not need a password.
Use this option to rebuild all subscription indexes for all Meta institutions for Serials in the system. Subscription indexes include the Subscription number index, Alternate subscription number index and the index containing supplier reference numbers (both at the subscription and type of holding level).
This option allows for the maintenance (add, delete, modify, copy) of publication pattern templates. You can also add templates to the system by using the option "Save as template" when defining a serials publication pattern in AFO 321 (see the help for this AFO for more information).
These templates appear in a dropdown list when you are defining a new type of holding for a subscription in AFO 321.
After choosing this menu option an overview screen will be displayed:

After installation this will contain various templates. But you are free to delete these and create your own.
: Choose this option to define a new code. See section 367.12.1.
: Select a code and choose this option to modify the properties. See section 367.12.2.
: Select a code and choose this option to delete the code. The system will prompt for confirmation.
: Select a code and choose this option to create a new code based on settings of the selected code.
: Choose this option to define a new code. An input form will be displayed:
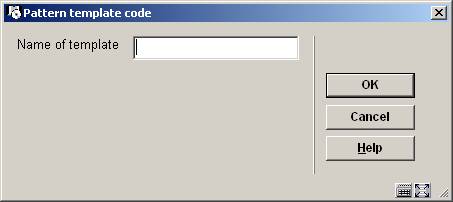
Enter a unique code and click , an input form will be displayed:
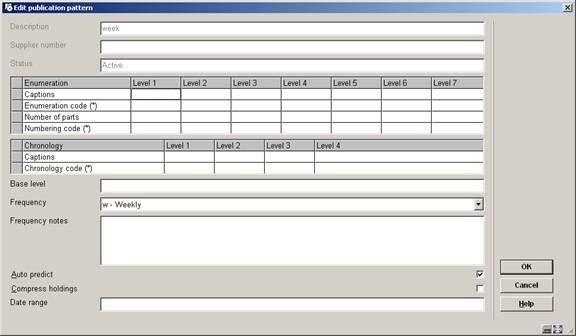
See the help for AFO 321 on Modifying Holding type and General groups for a full explanation of this screen.
: Select a code and choose this option to modify the properties. An overview screen will be displayed:
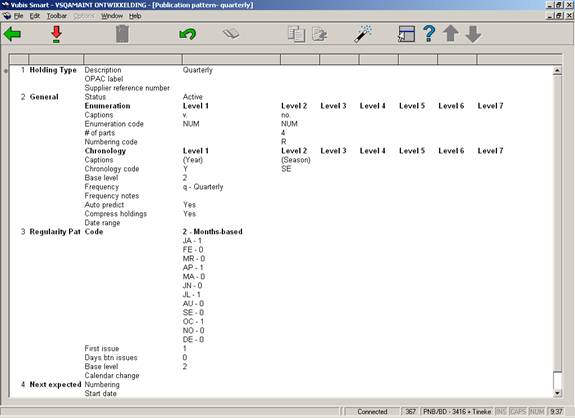
See the section on Publication pattern detail in the help for AFO 321 for an explanation of this screen.
Note
Not all options that are available in AFO 321 are available here.
·
Document control - Change History
|
Version |
Date |
Change description |
Author |
|
1.0 |
July 2006 |
creation (as part of updates for release 2.4.2 serials maintenance) |
|
|
2.0 |
March 2007 |
added new parameters under Miscellaneous |
|
|
3.0 |
October 2007 |
added info on new authority lists; added new parameter under Miscellaneous; improved explanation of decentralized printing; added new option Pattern template codes Delivered as part of 2.4.2.4 updates |
|